What are recursive workflows?
Recursive Workflows were a welcome addition to Bubble’s toolbox in September of 2018, and there are many good reasons for this being a sorely missed feature. So… what exactly is it? Let’s dig into it.
A recursive workflow is simply a workflow that will repeat itself until a specific condition is met. For each cycle that is repeated, you may provide new parameters to the workflow, meaning for example that you can move through a list of Things, focusing on one of those Things in isolation every time the workflow is looped.
For those who come from a programming background, a recursive workflow is a “Do X While Y” loop, where both the parameters in X and Y can be dynamic.
First, some basic facts. Recursive Workflows:
- Can only be run as a back-end workflow (not on a Page)
- As such, will continue to run even if the Page is closed
- Are triggered sequentially (one cycle will not start until the previous is finished)
- Can go on forever
- Will never time out
What’s the difference between a Recursive Workflow and Schedule API workflow on a list?
The two may seem like the same thing on the surface, but looking closer there are some key differences that can matter a great deal to your development.
| Schedule workflow on a list | Recursive workflow |
| Must be run on a list | Can, but doesn’t have to, be run on a list |
| Can run workflows in parallel | Workflows are run sequentially |
| No way of telling when it’s done | Can tell when it’s done |
| Will run until list is finished | Can check dynamic condition for every cycle |
| Delay in-between is set | Delay can be dynamic |
An easy way to see the difference between the two is to realize that Scheduling a workflow on a List doesn’t really mean looping a workflow: it means schedule one workflow for each item. Bubble will schedule one workflow to run at a specific time for each item that you provide, and they may or may not be spaced out. If you schedule them without a break in-between, Bubble try to process them simultaneously, provided that it stays within the constraints of your app’s capacity. Bubble’s engine may add a delay between them to make sure it doesn’t eat up all capacity at once (if you’re on a shared server).
Recursive workflows are a bit different, in that Bubble only schedules one workflow, and that workflow contains an action that schedules itself immediately or in the future, often with a condition attached. What this means in practice is that you can control in each cycle whether to run it again and when. This can be used to loop a workflow as long as a dynamic condition is met, and it also means you can decide the delay between those cycles dynamically – everything from immediately to weekly, monthly, yearly or whichever time you want.
Another key difference is that recursive workflows are not actually a Bubble feature per se – it’s something you set up yourself. So don’t look for it in the list of actions.
How to set up a Recursive Workflow
Recurring workflows
Recursive workflows, as we’ve explored, can be used to process a list of Things, but doesn’t have to. It can also be used to simply schedule a workflow at regular intervals. Let’s say you have 24-hour Snapchat clone, where you can post as many posts as you like, but at midnight they’re all wiped (sounds awesome!).
First, we’ll set up a regular back-end workflow:
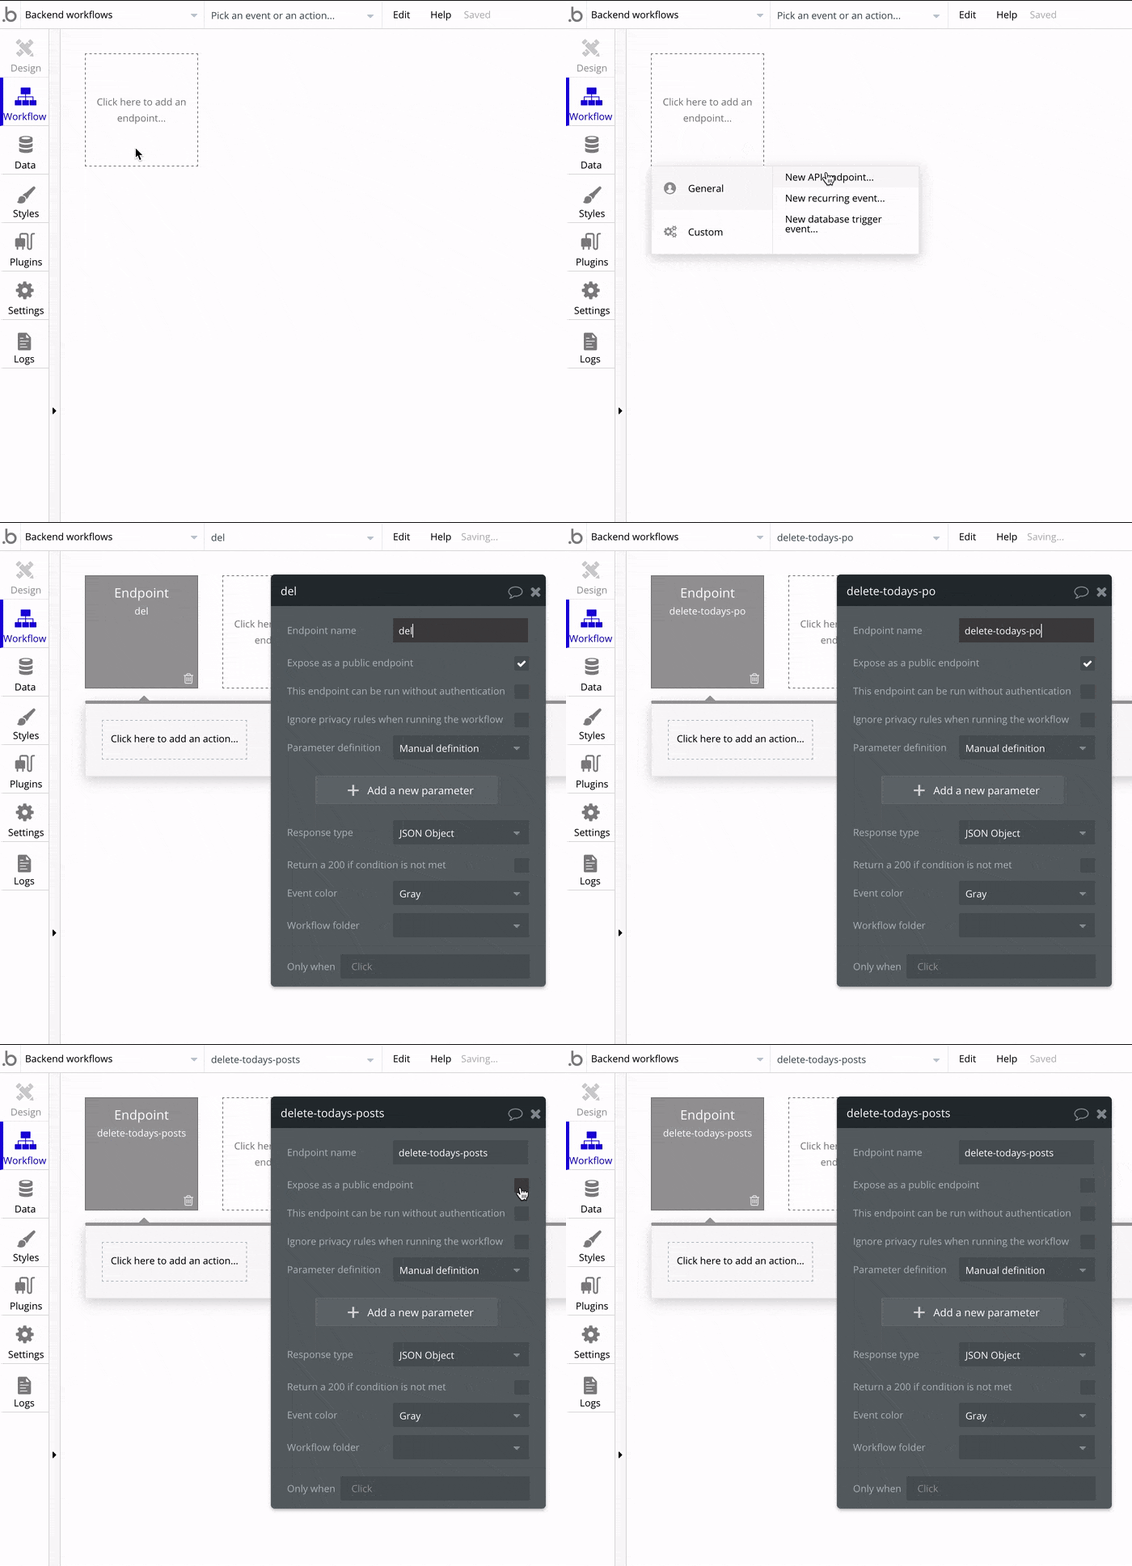
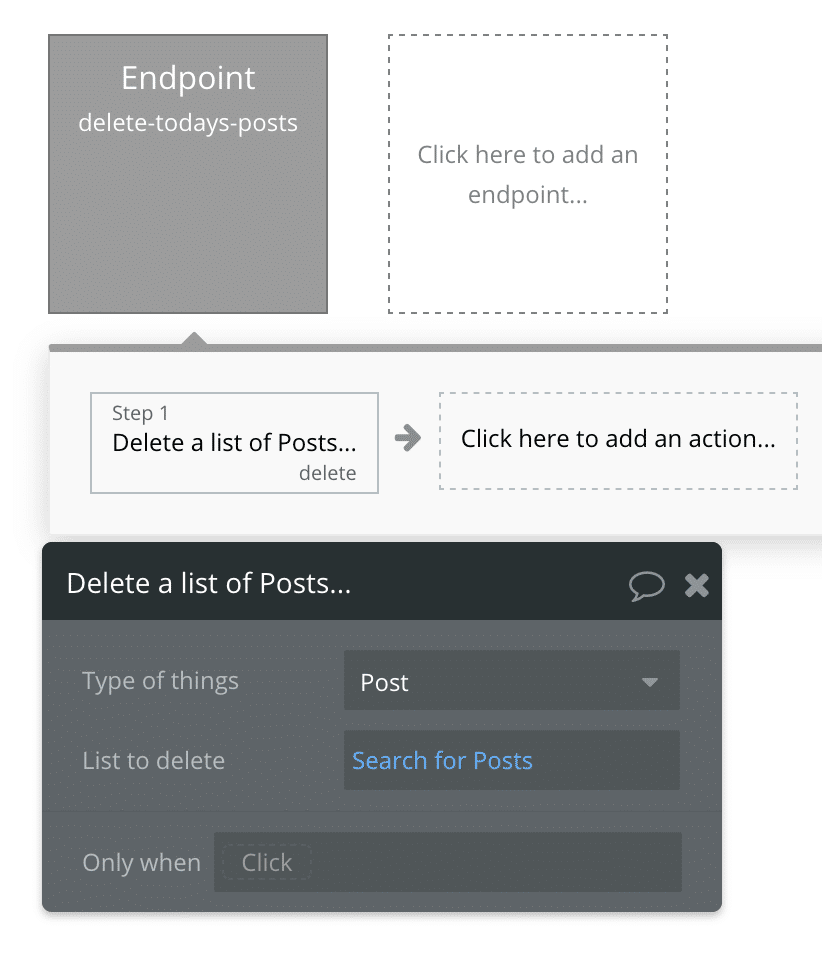
Then, we’ll add an action in that workflow that searches for all existing posts and deletes them:
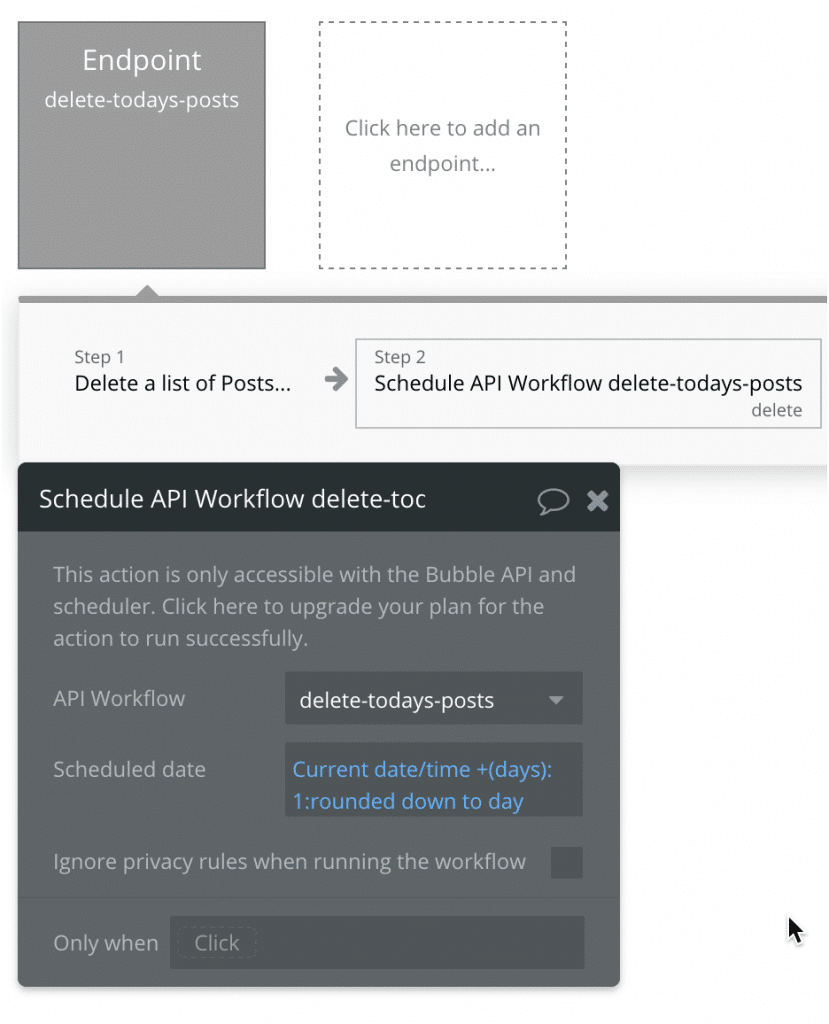
And finally, we’ll set up a final action in the workflow to schedule itself in one day. Note that we’re using the :rounded down to day function, because the workflow may take a few tenths of a second to complete, and over many repetitions, that tiny difference can start to delay the workflow noticeably (giving teenagers all over the world several seconds extra of fame per day).
Why not use Bubble’s Recurring Event feature, you might ask? Well, there are two reasons. First, recurring events are not very flexible: they’ll run at a set interval no matter what, not caring about the actual time or any constraints. Secondly, running them frequently is limited to upper tier Bubble plans. To me, the Recurring Event feature is more or less deprecated at this point.
Processing a list
As the last example illustrated, recursive workflows can be used simply to keep a workflow running at regular intervals. Let’s now look at how you can use them to run a workflow on a specified list of Things. As with anything in app development, there are numerous ways to solve a problem. I’ll present here one of the simplest ways. This is also the one I see used the most. Your app’s needs may present some other needs, so don’t be afraid to deviate from my example here.
In this example, let’s assume that you already have a live app with a few thousands Users in it. A few months after launch, you decide that every User needs to go through a verification process by sending them an SMS. Your existing users however, don’t need this confirmation. You add a Yes/No field on the user called Verified. Now let’s look at how we can set this field to Yes on the thousands of existing users.
Setting up the back-end workflow parameters
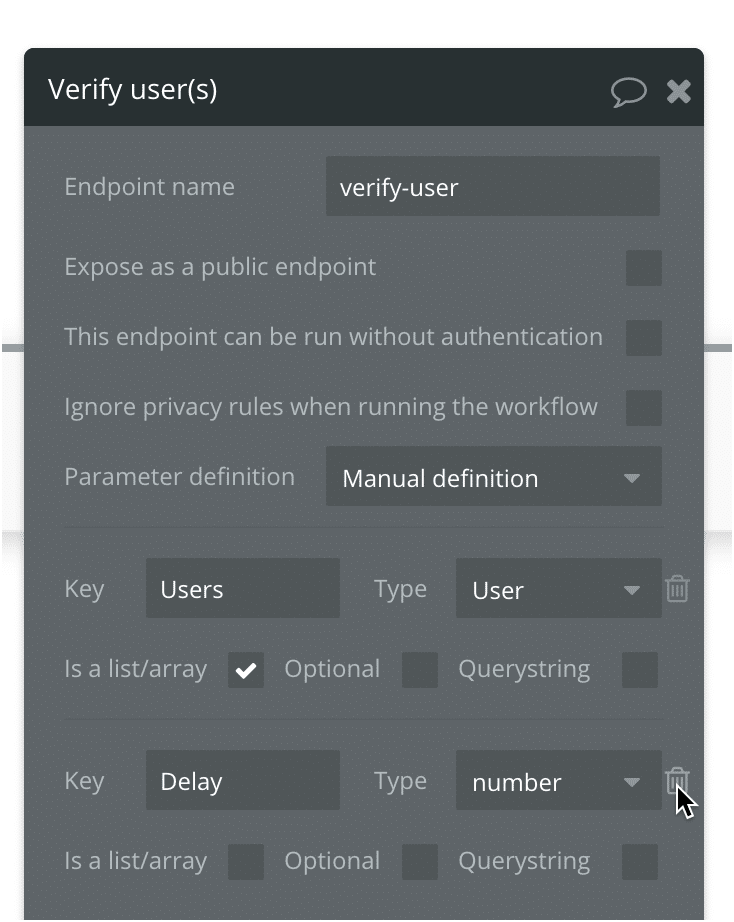
This back-end workflow is going to need two parameters:
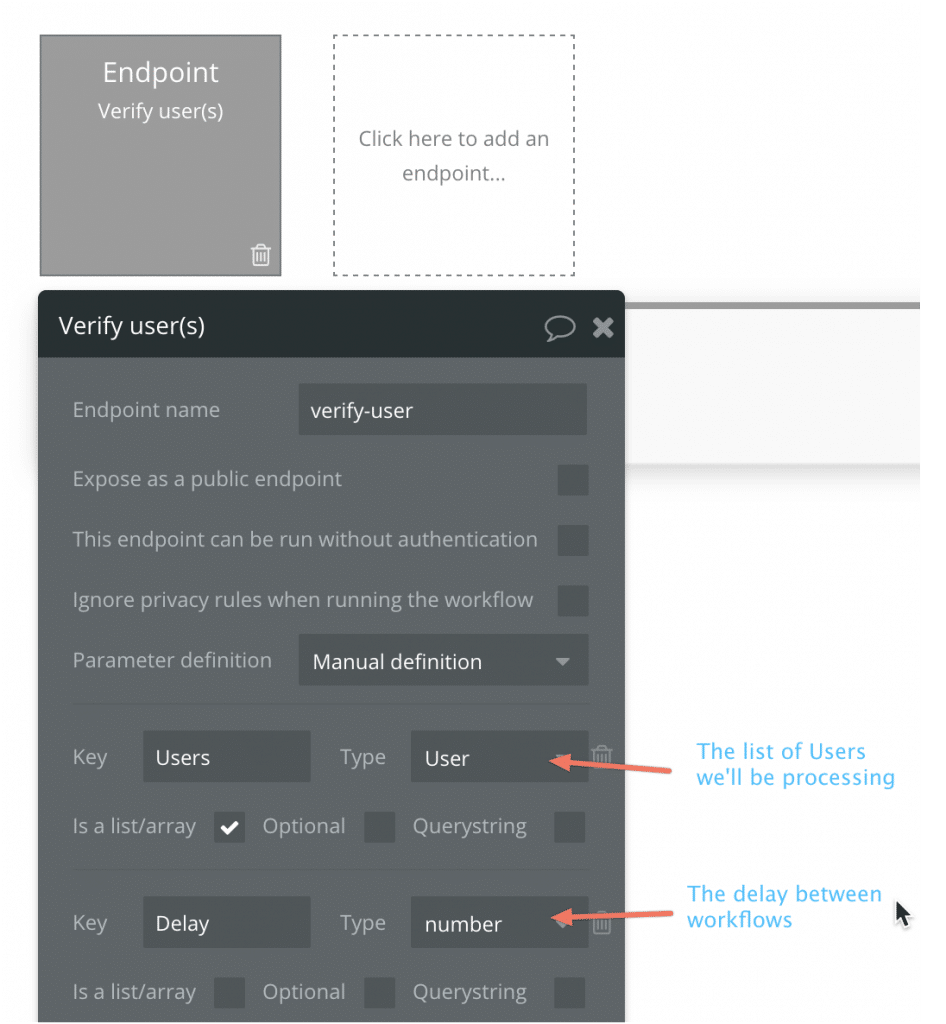
Users: This is the list of Users that we want to process. Since we only want to handle a specific list of Users (those who registered before the verification process was implemented), we want this list to be static.
Delay: This is a number signifying the number of seconds of delay that we want in-between each cycle.
Setting up the actions
We now have a back-end workflow that accepts a list of Users, and a Delay. Now, we’ll set up the actions that make changes on the Users:
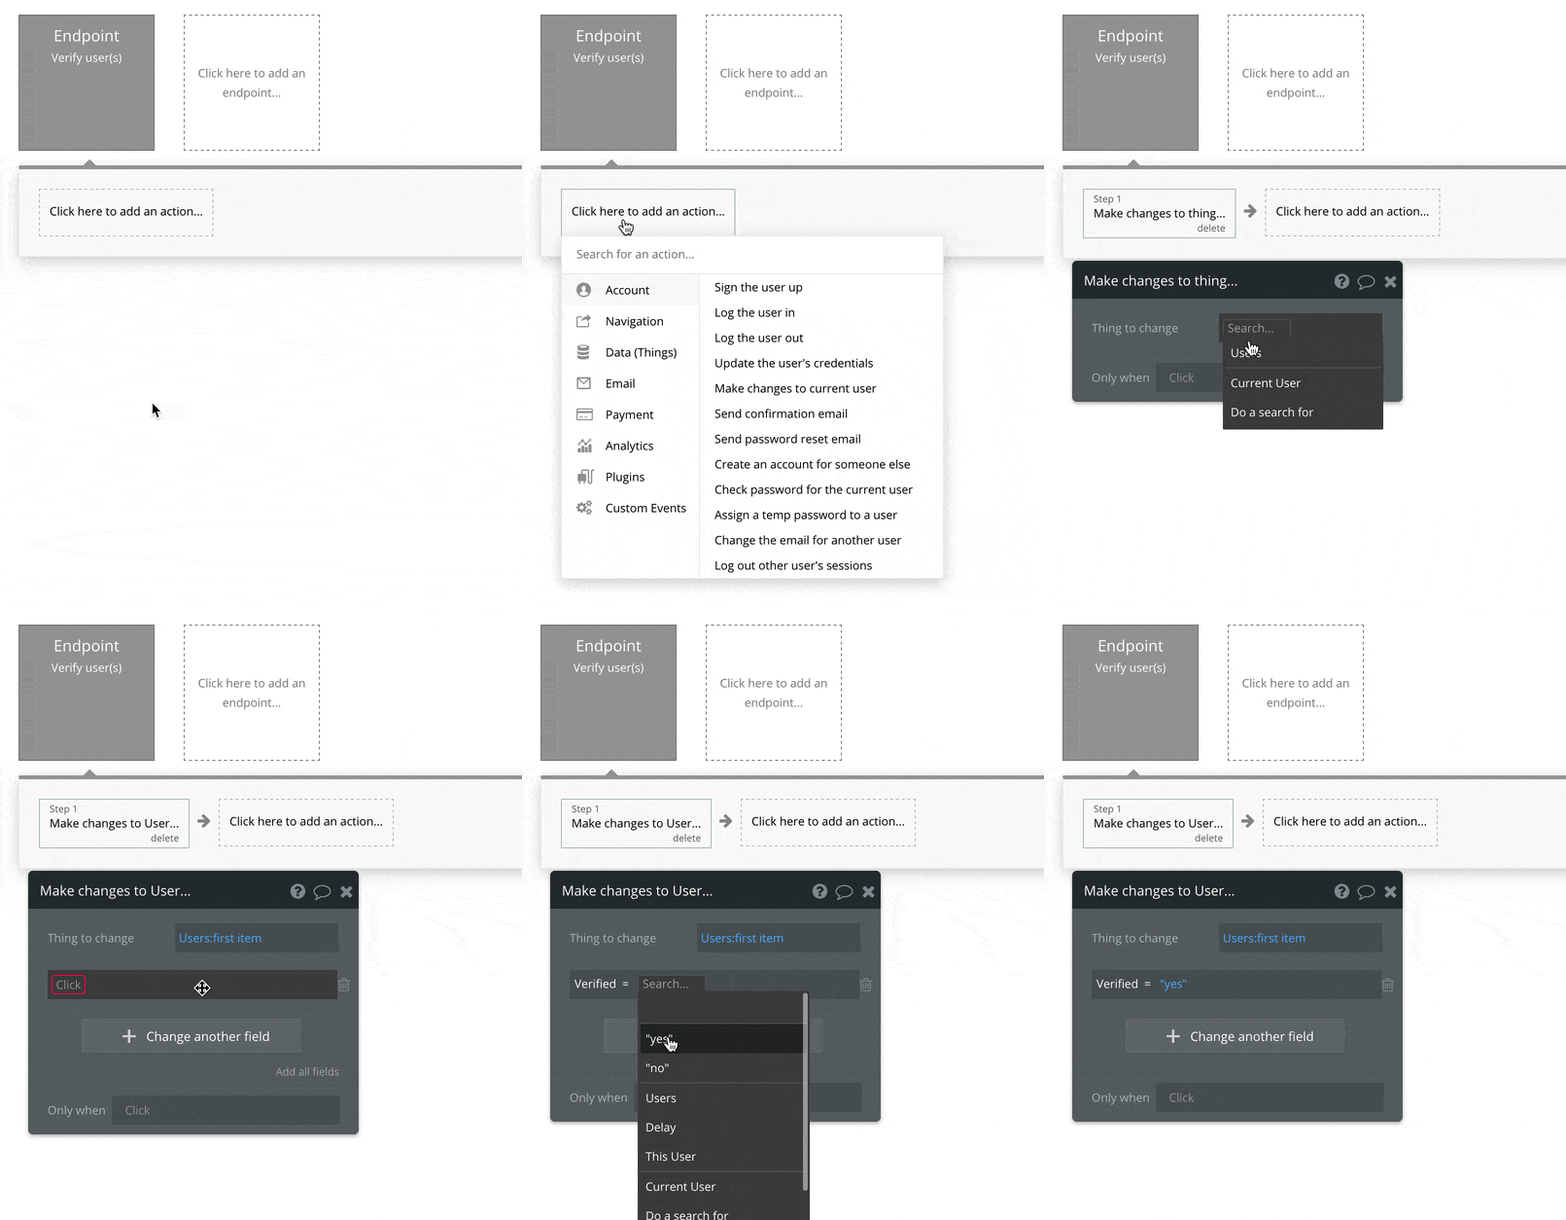
We’re now telling Bubble not to make changes on the entire list, but only the first entry in that list. This is because the Make changes on a List action would likely timeout and never finish, as we’re working on several thousand records. After this action is performed, the first User on the list is officially verified. Now we’re going to schedule a new cycle of that same workflow, but with some key changes:
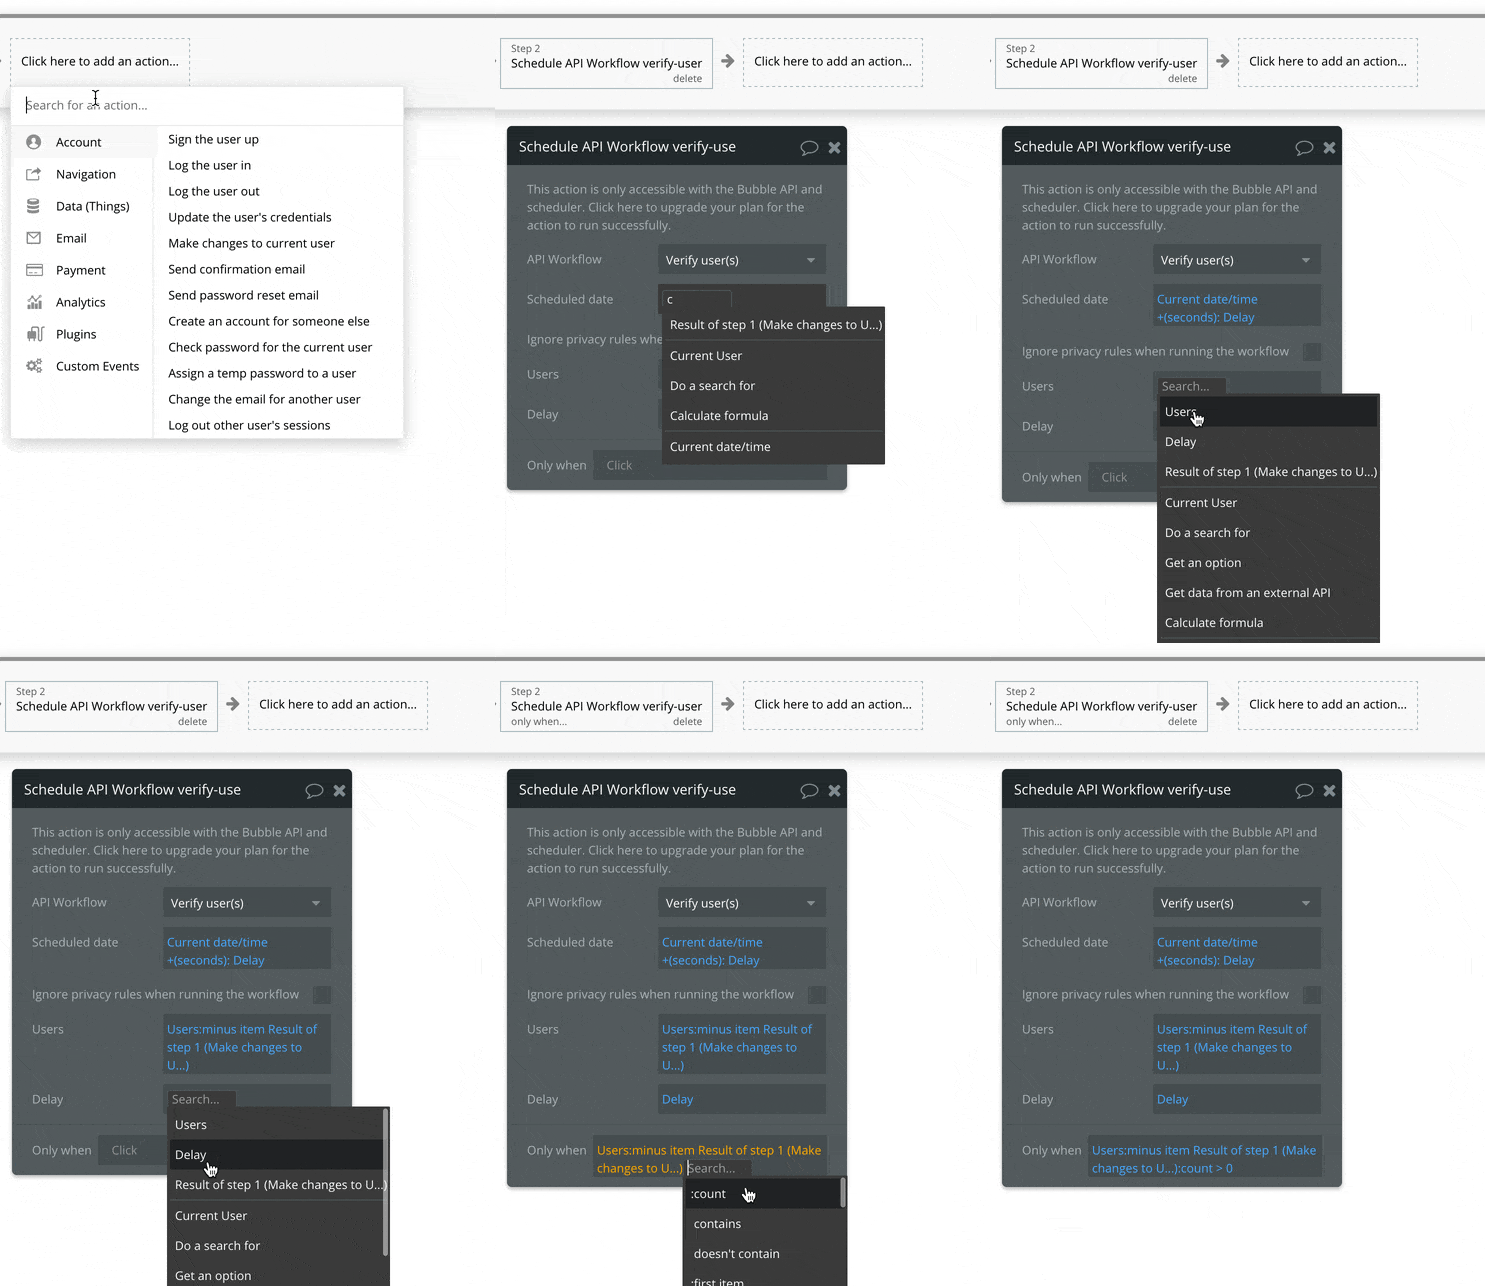
Let’s look at what’s going on here:
- First, we’re simply scheduling a Back-end workflow – the same that’s currently running
- Next, we’re scheduling at the Current date/time:plus seconds the amount we passed in the Delay parameter, to make sure Bubble waits a bit before runnning the next one. This is to make sure the workflow doesn’t max out our capacity.
- Then, we pass on the list of Users. Note that we’re sending the exact same list minus the user that we already processed in step one.
- We pass the Delay value on to the next cycle unchanged. This is simply to keep the same delay between all cycles.
- Finally, we add a Only when condition to check that there are still Users left in the list. If the count is 0, we don’t need to schedule another cycle
Saving the Delay value in an Option Set
The amount you should provide in the Delay value varies, based on the amount of processing Bubble has to do in each cycle. If the workflow is complex, you may need 5 seconds between each cycle to keep your capacity stable. For most workflows, you’ll need about 1 second, and for very easy ones you can go even shorter. All of this depends on the plan you’re on too.
In my experience, workflows usually fall into one of three categories:
- Simple: short, easy workflows that need less than a second of delay
- Medium: a bit more complex, needing 1-2 seconds
- Complex: Complex workflows involving database-heavy operations like multiple searches may need 5 seconds or more
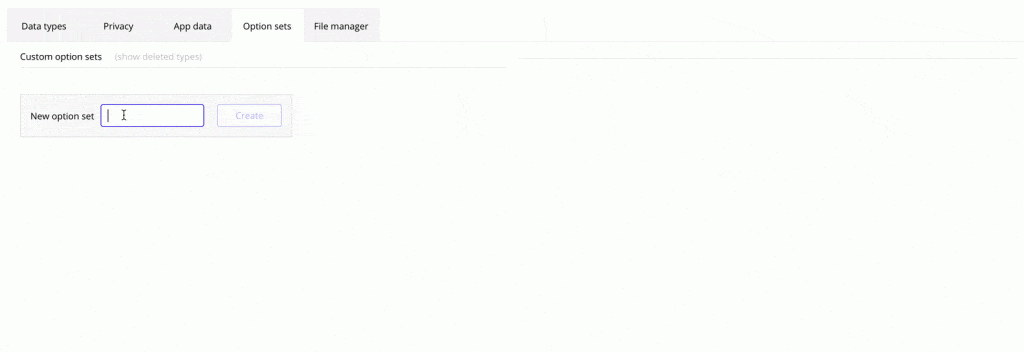
You’ll usually want a Workflow simply to finish as fast as possible, and to make sure that you can easily set a Delay that makes sense for multiple workflows, I often save the number in an Option Set. First, create the Option Set and add an attribute called Delay:
Then, we add our three Delay categories:
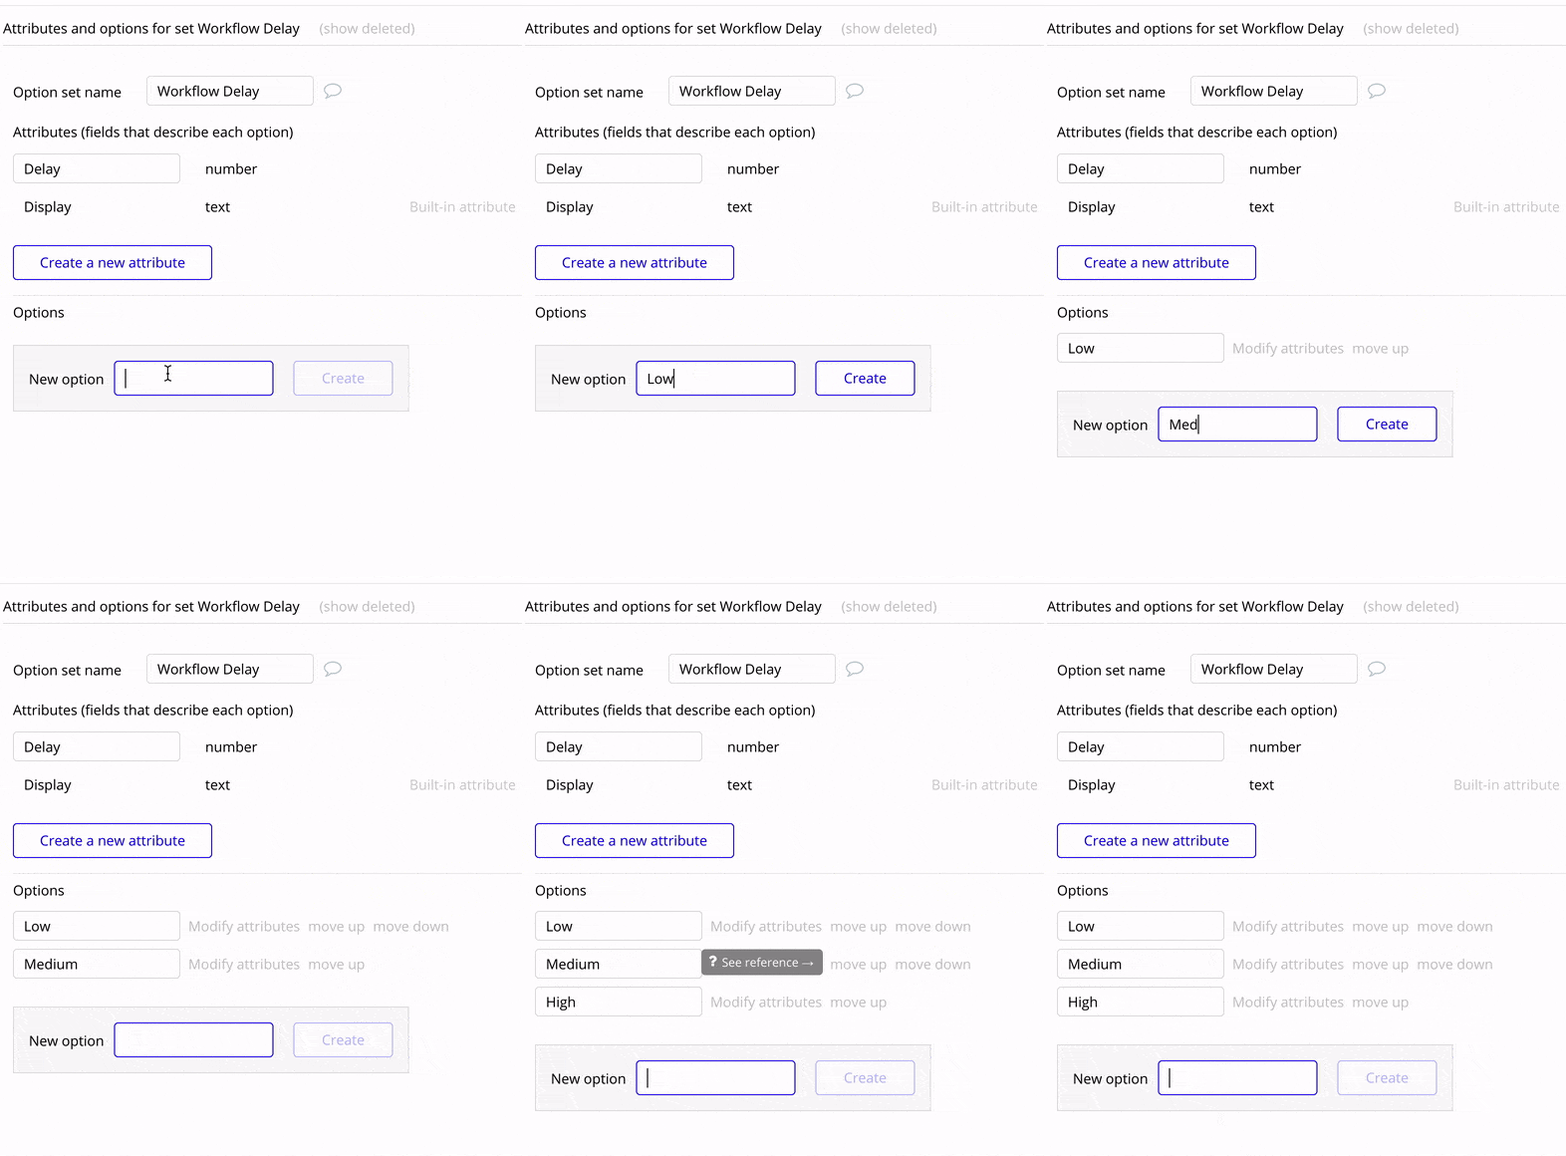
Lastly, we add the delay to each one. Here, we’ll set the Low Option to 0.5. Make sure to give all three options a value.

Now, in the back-end workflow we created earlier, we can forget about the Delay parameter and simply delete that value from the Workflow. We’ll be referring to the Option Set instead:
In the last action (the one that re-schedules the workflow), we’ll simply pick a Workflow Delay category:
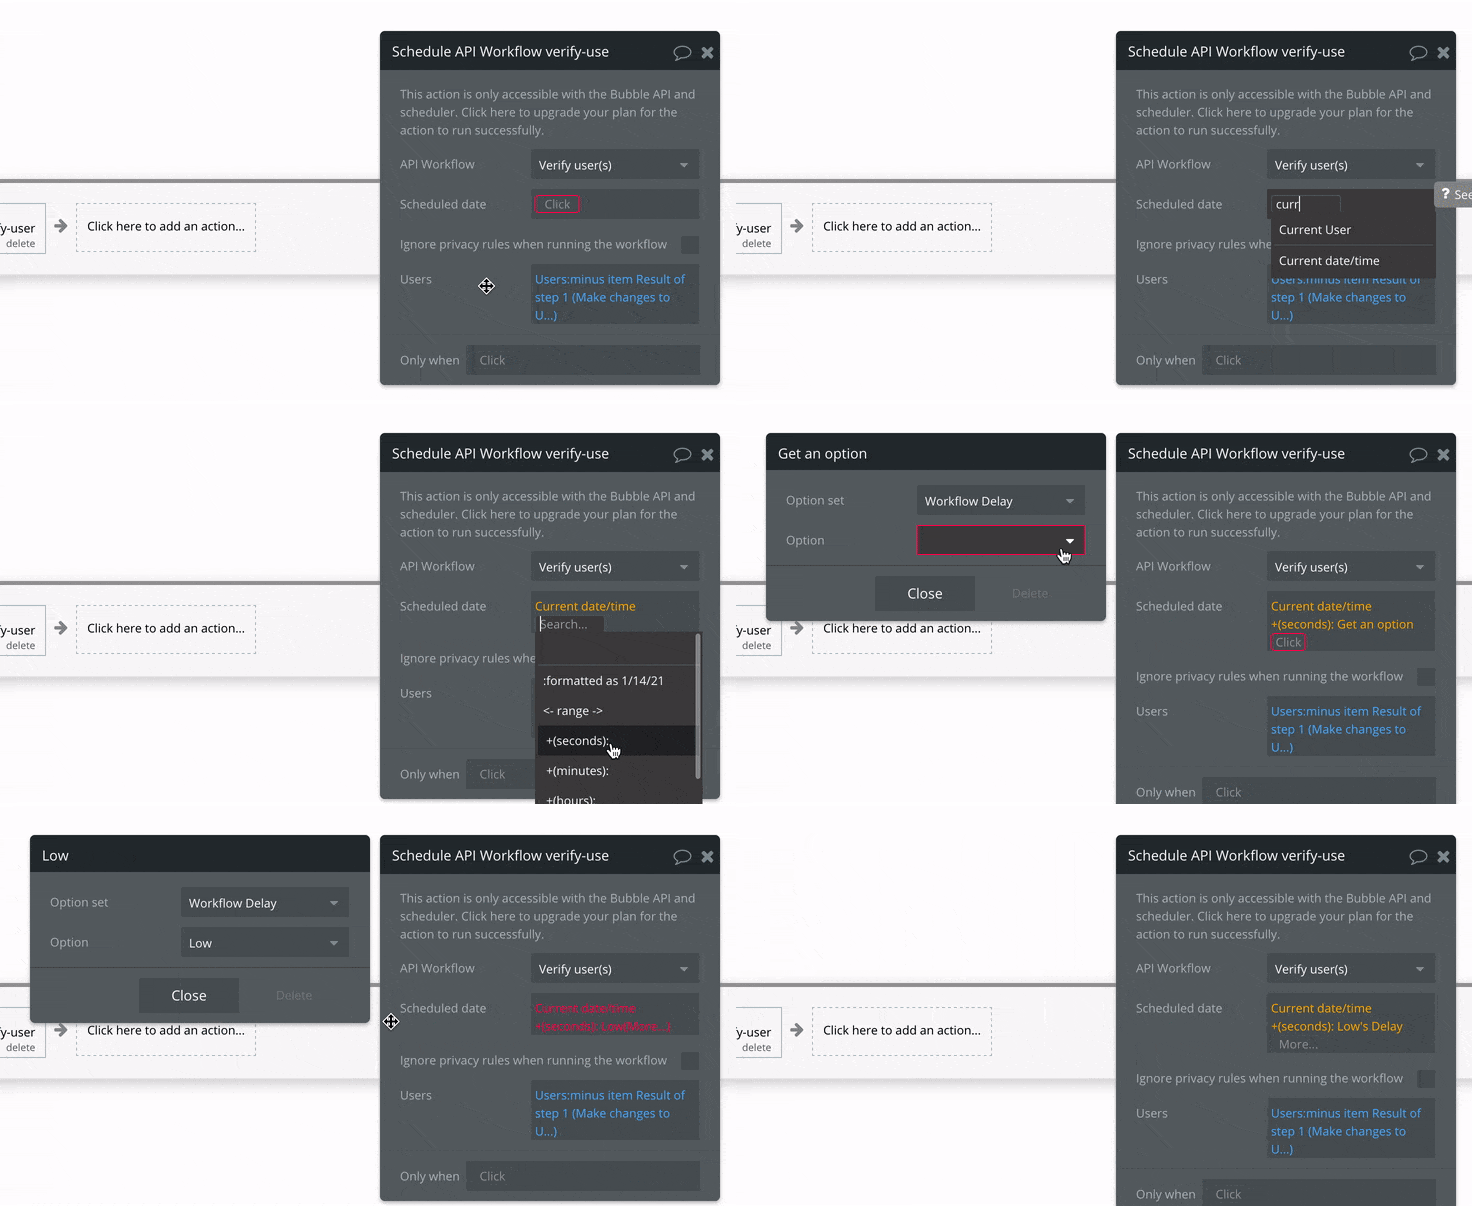
The reason this makes sense is that the circumstances of your app may change over time (more users in the system, upgraded or downgraded plan, etc), and this makes it easier to adjust your processor usage as you see fit, simply by changing the value of the Option Set. If you consistently use this method on all your recursive workflows, making changes to tens or even hundreds of them is done by changing a simple value.
How to cancel Recursive Workflow from the Bubble editor
Every new cycle of a recursive workflow is not triggered, but scheduled (even if you schedule it with no delay). This means, just like for every other scheduled back-end workflow, that it’s given a unique id and a timestamp on which to execute.
Sometimes, you may unwittingly (or wittingly) schedule a recursive workflow that goes on forever, by forgetting a condition for example. If you happen to forget about setting a delay between the workflows too, then a loop like that can easily eat up all your available server capacity.
To cancel a workflow, do the following:
- Go to Logs – Scheduler
- Click Show (you usually don’t need to specify a time, as it defaults to the current time)
- On the leftmost column of each scheduled workflow, you’ll see a Cancel button. Clicking this will cancel that specific workflow
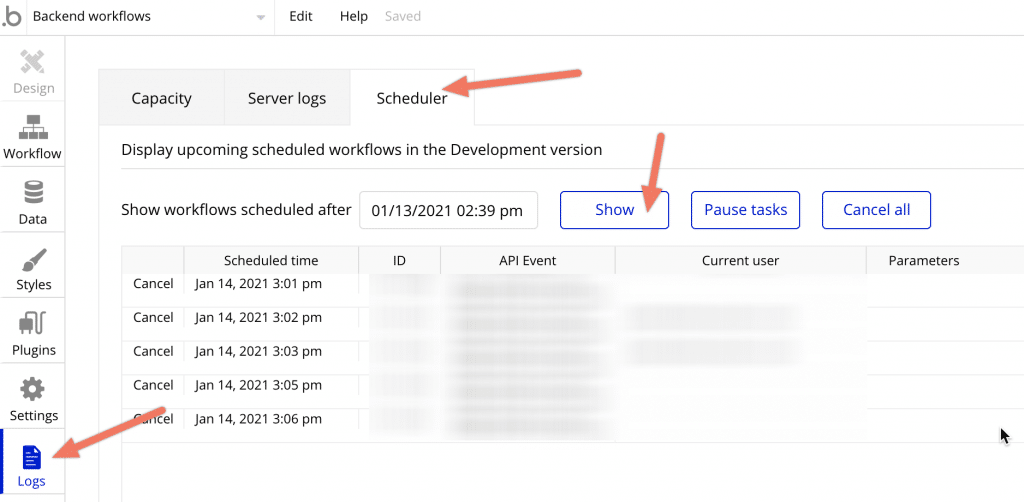
Canceling all future workflows
Sometimes, the easiest solution is simply to cancel all future workflows. The Cancel all button will take care of this.
Pitfalls
You should keep a few things in mind when using this part of Bubble:
- Your version-test and live app versions are separate – be mindful of which version you’re working on
- The Cancel all will cancel scheduled workflows. In other words, it won’t stop workflows that have already started. This can sometimes make it difficult to stop a recursive workflow running wild, since the workflow may already have started and will end with scheduling itself for a new cycle. Since it hasn’t been scheduled yet, Bubble can’t cancel it. In that case, use the Pause tasks button to stop it from continuing, and manually cancel each workflow.
- Don’t forget to deactivate Pause tasks, as it will stop every back-end workflow in your app from running!
- In general, be careful when using the functionality in this part. Especially for more complex apps, canceling all workflows can have major consequences, as can pausing them.
That’s it for part one of the series on Recursive Workflows. If you liked this, you can also check out my book on Bubble performance or even buy me a coffee, or dive right into part two, where we’ll discuss how you can track the progress of your Recursive Workflows.







4 Comments
Hi Petter,
Thank you so much for this article. This is great stuff! This targets one of Bubble’s pain points, I think. Where you ‘simply’ want to edit some bulk data in the data editor. Only to find out that the loading screen keeps loading and never really finishes.
Thank you so much for writing all of this down and even making the screen recording/gifs 🙂
Thanks for commenting Jelle! Yes, recursive workflows fall a bit between the cracks of Bubble’s ‘officially listed’ features, especially given that you already have features to make changes on a list or Schedule an API workflow on a list. Naturally, new users will assume this is the best way, since it’s a dedicated feature.
But for bigger data sets, recursive workflows are really the best, often only, way to do it.
Thank you SO much for this!!! It helped me FINALLY understand how to do a recursive email mailout. Invaluable and totally appreciated. Thank you so much.