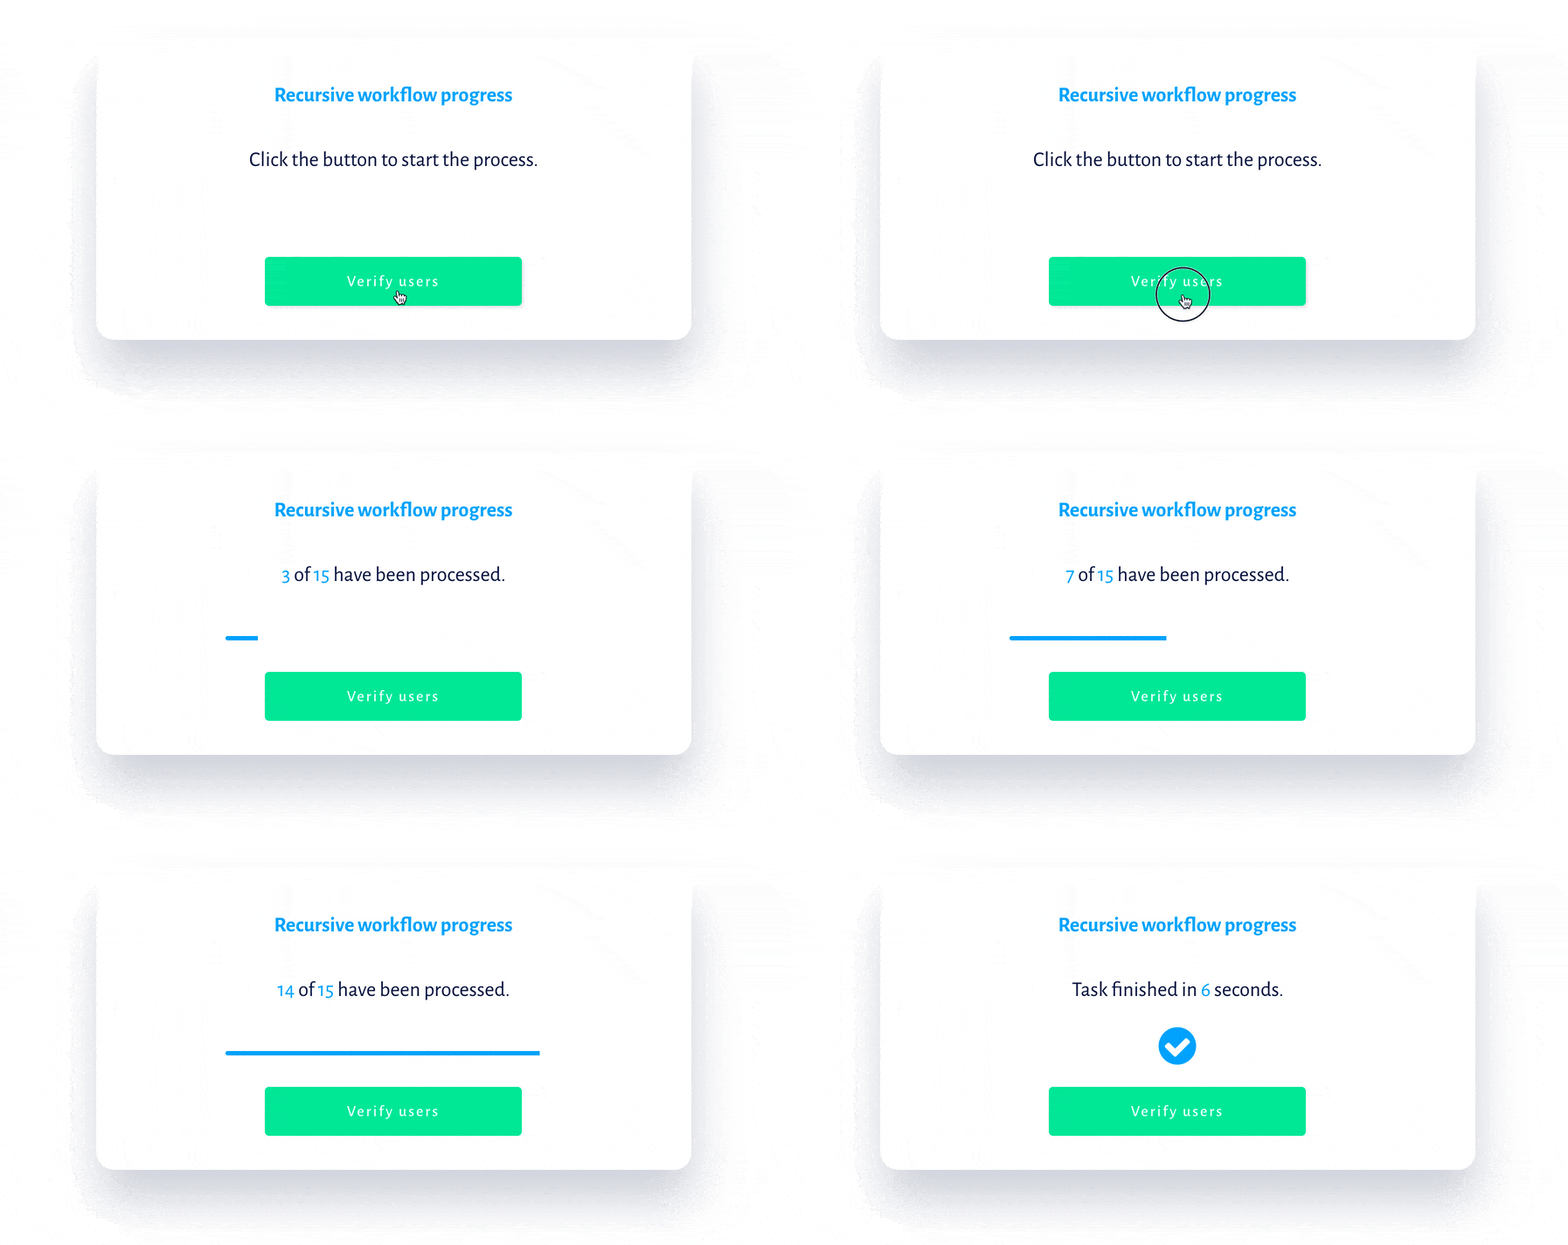
If you’re a non-believer in the awesome power of Recursive Workflows, I’m here to change your mind. With a pretty simple setup, this is how we can loop through workflows like a warm knife through butter, and visualize the process for the user live. The illustration below is the kind of sweet stuff we can get working with recursive workflows:
In my last article about Recursive Workflows, we went over the basic way to set them up to run reliably. And indeed, reliably is the keyword here – unlike Schedule workflow on a list and Make changes to a list of Things, the core strength of a Recursive Workflow is that is does not time out. You can trust that it will finish the job no matter how long it takes. It’ll even run forever if you forget to stop it.
Don’t believe me? I once missed setting the Condition on the last step of a workflow in a client app. It kept running for three months making the same change over and over until I discovered it. That’s how reliable they are (and how great I am).
(Before you get your knickers in a knot, the one exception of course, is if you actually spend all available server capacity – in which case any workflow, including recursive ones, will time out. So keep an eye on your capacity).
Not only will it finish, but because you set the time in-between the cycles yourself, you can pretty reliably predict when it will finish. If you run a simple workflow 60 times with 1 second between each cycle, it will finish in roughly one minute, with the complexity of the actual action steps being the only unknown in the calculation.
All that being said, there are still of course many reasons for why you would want to know exactly when a recursive workflow is finished, or even how far along it is. Actually, recursive workflows allow you to provide more information about the state of an ongoing process than a regular Bubble workflow.
Before diving into this one, I highly recommend that you read the first part of the series, as we’re building on the foundation from it.
Now let’s have a look.
Why track the progress of a recursive workflow?
This may seem obvious, but let’s talk about it anyway. As it often is with Bubble, there are two different perspectives to think about here:
The developer perspective
As the developer, you have concerns that your users may not have. Will the workflow finish at all? Can I learn how fast a workflow typically finishes? Will this one make it in time for the launch tomorrow? When you work on complex apps, you’ll find that you need to run recursive workflows without your client’s or users knowing. Maybe a change in the app needs an update to a long list of records? Maybe you made a mistake somewhere that affects hundreds or thousands of users?
The point from the developer perspective is that you’ll often need a reliable way to tell whether an operation is successful or not, and keeping an eye on its progress is a good way to learn how your decisions affect your app’s performance.
The users perspective
The needs of the users are different. You may want to visualize the progress of a certain task in a progress bar, show how many records have been completed or send an email when the task is done.
It’s usually the case when you use a recursive workflow that you want to process a lot of records, and in many cases you’ll have to make a choice on how to communicate that. I go into detail in my book about the need to control the user’s attention to keep them happy when a task is being processed.
Ways of measuring the status of a recursive workflow
Ok, so knowing who would actually want to know the workflow’s status, let’s look at different ways that we can track the progress to communicate an ongoing status update:
| We’re tracking this… | …to communicate this |
|---|---|
| When the workflow is finished | Task is not finished / Task is finished |
| How many records have been processed | 67 out of 250 records have been completed |
| The percentage of records finished | The task is 18% completed |
| How long the workflow took to complete | The task was completed in 3 minutes |
| Predicting when the task will be completed | The task will be completed in about two minutes |
Setting up the structure in Bubble
For all this to work, we’ll introduce a new Data Type and extend the Option Set from part 1. The Data Type will help us track the progress as the workflow is chewing on its tasks, and the Option Set we’ll use to store some static values.
Setting up the Workflow log data type
The purpose of the Workflow log, as the name suggests, is to save a record of the progress of a given workflow. So create a new Data Type called Workflow log, and set it up with the current fields:
| Field name | Type | What we’ll use it for |
|---|---|---|
| WorkflowType (optional) | Option set | To separate different types of workflows from each other |
| records | Number | The total number of records to be processed |
| recordsProcessed | Number | The number of records that have been processed |
| startTime | Date | The timestamp when the workflow starts |
| endTime | Date | The timestamp when the workflow is finished |
Setting up the Workflow Delay option set
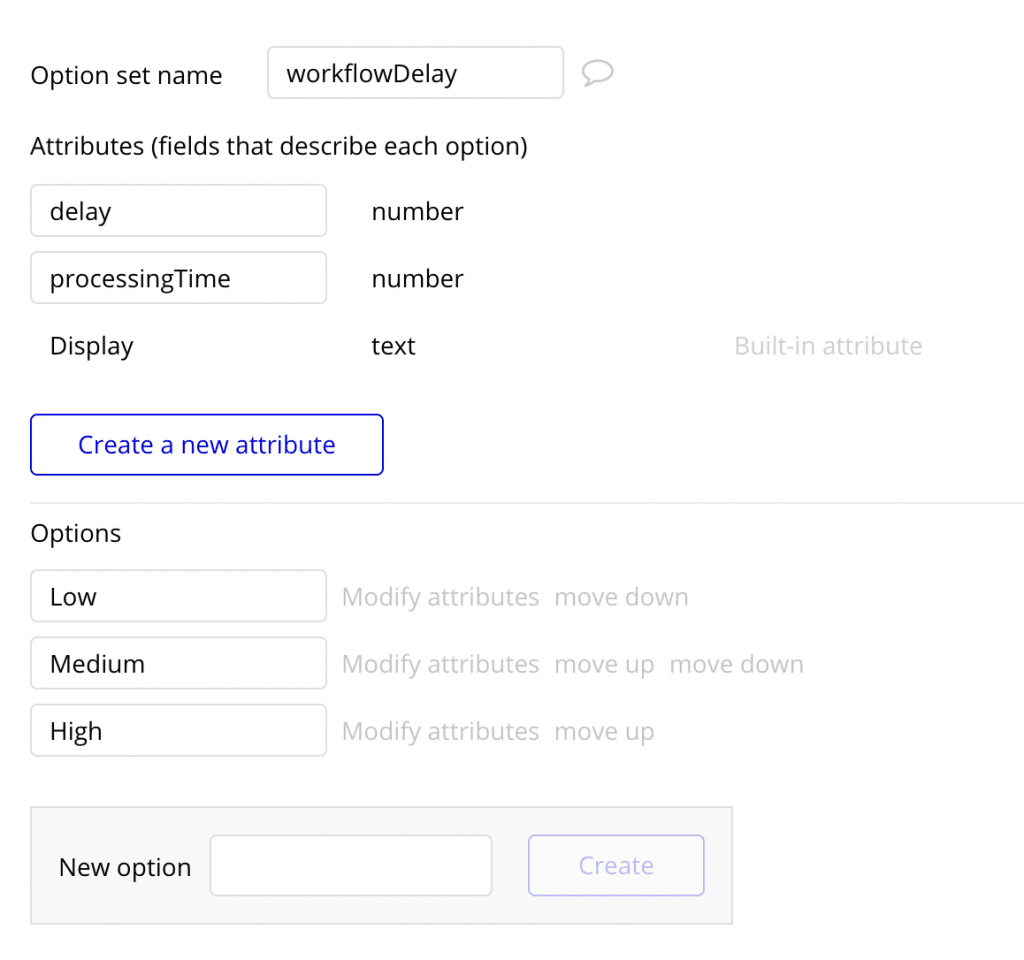
This Option Set serves the same purpose as the one we set up in part 1. We used it to store three different levels of task complexity: Low, Medium and High. But for this round, we’ll add one more field, called processingTime:
| Field name | Type | What we’ll use it for |
|---|---|---|
| delay | Number | The number of seconds between each cycle of the workflow, i.e. 1 sec |
| processingTime | Number | The approximate time it will take to finish the workflow, i.e. 0.3 sec |
The value in processingTime is not that important right now, as you’ll have to observe what value makes sense in your app. Your option set should now look like this:
Setting up the Back-End Workflow steps
This part is mostly the same as we did in part 1, but with some key difference. In the end, all we’re adding is two more steps, and that’ll give us access to all the information listed earlier. Holy smokes! So let’s get it done.
Adding the parameters
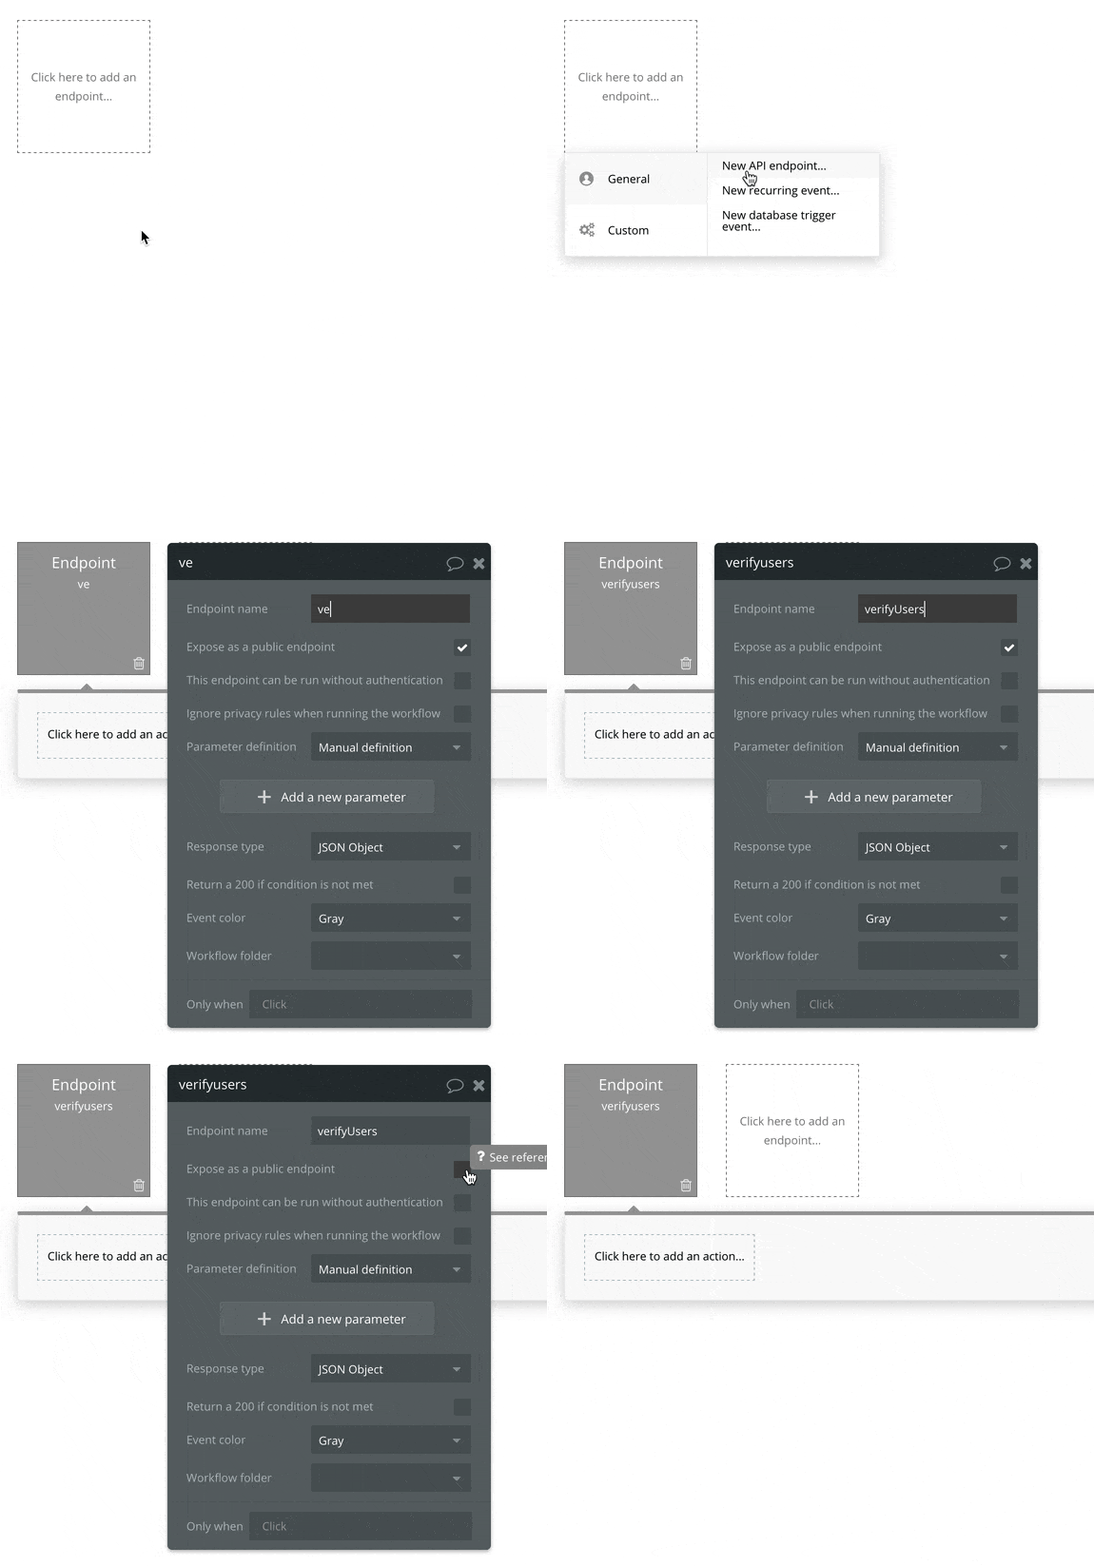
We’re gonna make some slight changes from our last setup to make sure we can track the progress. First, create the back-end workflow and name it:
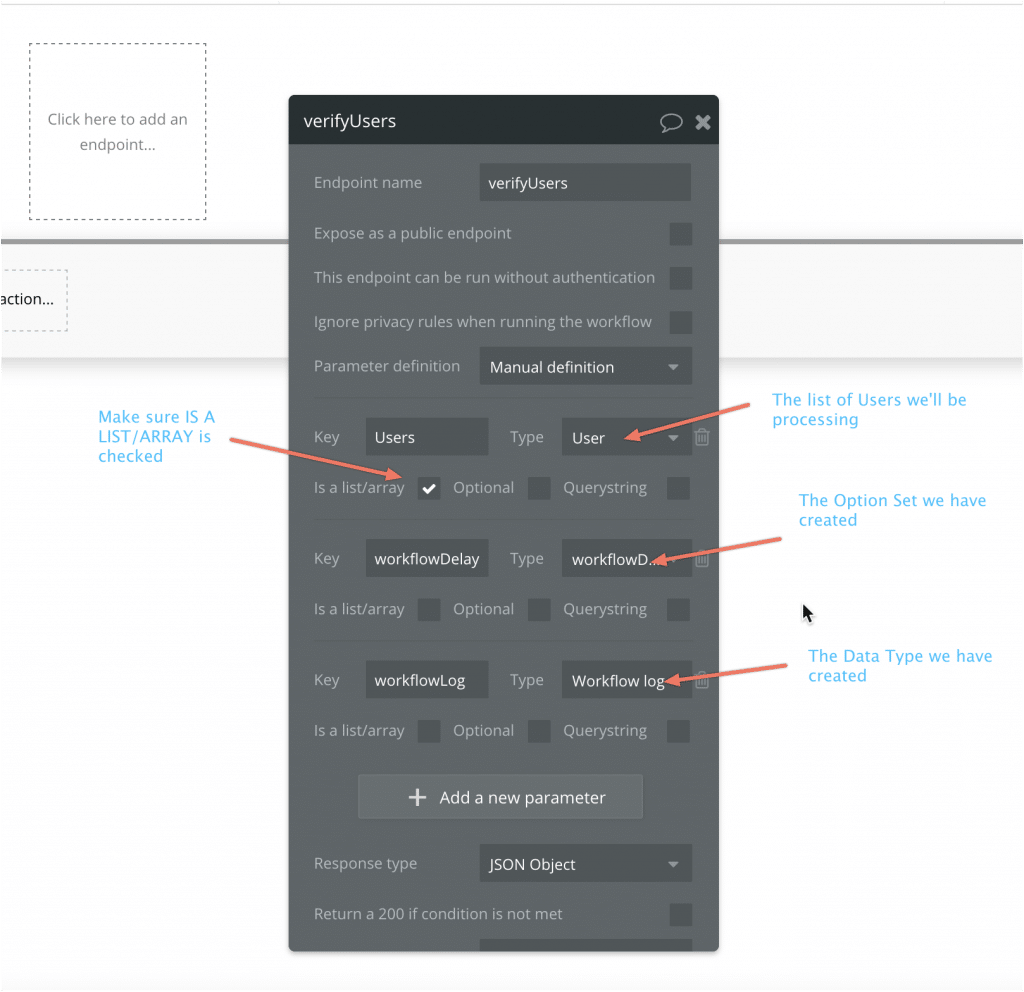
Set up the parameters as illustrated below:
Setting up the workflows
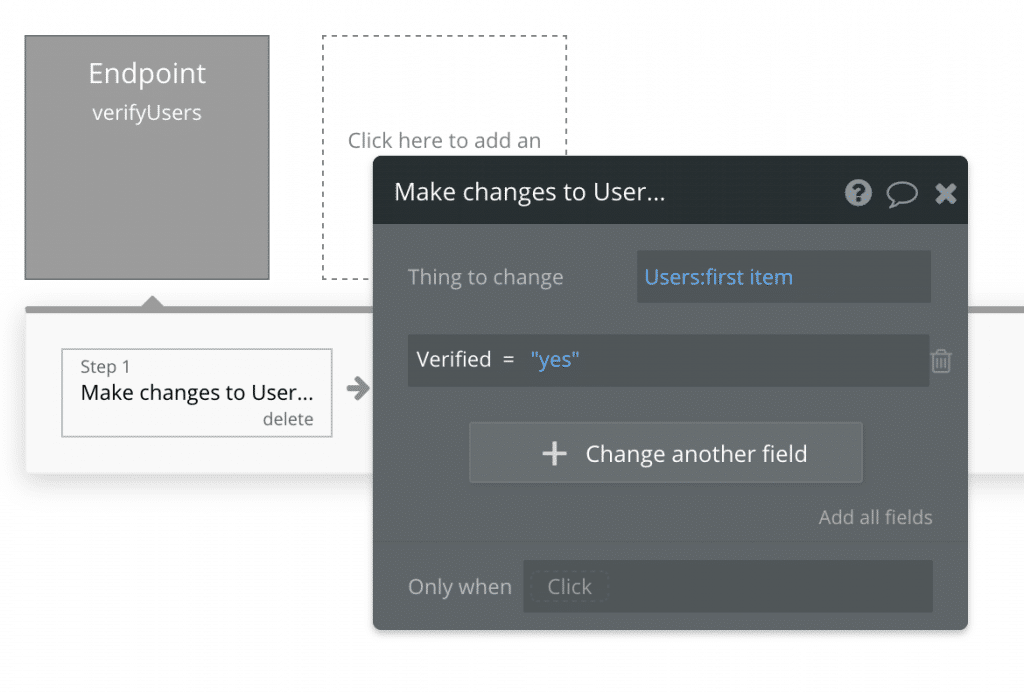
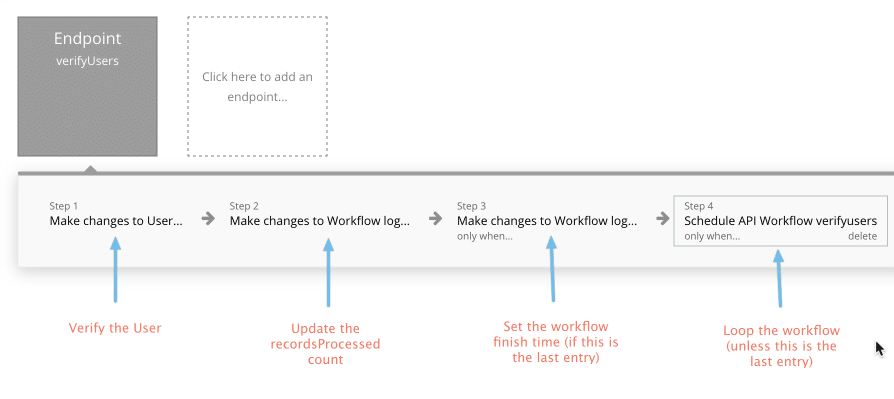
The first step of the workflow you’ll recognize from part one. All we’re doing is making a change to the first User on our list:
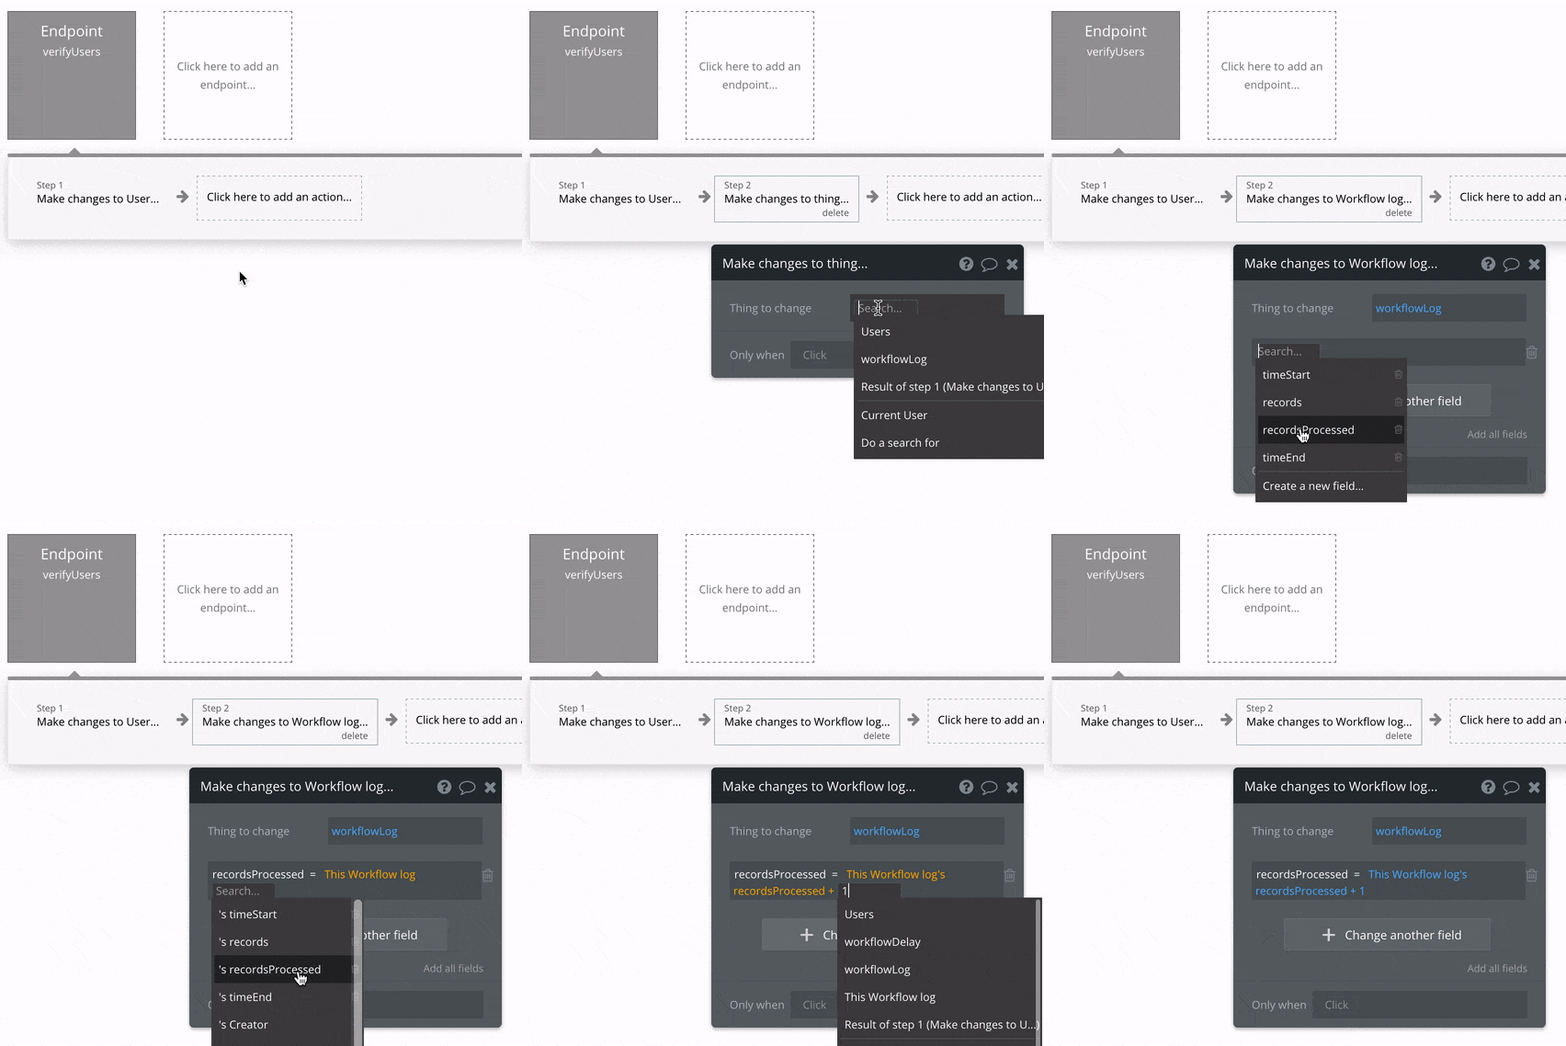
Now for our next step, we’re going to save changes to our log. We’re going to add 1 to the field recordsProcessed. On the first cycle of the recursive workflow, this is going to change it from 0 to 1. For every repeating cycle, we’ll know how many cycles the workflow has processed:
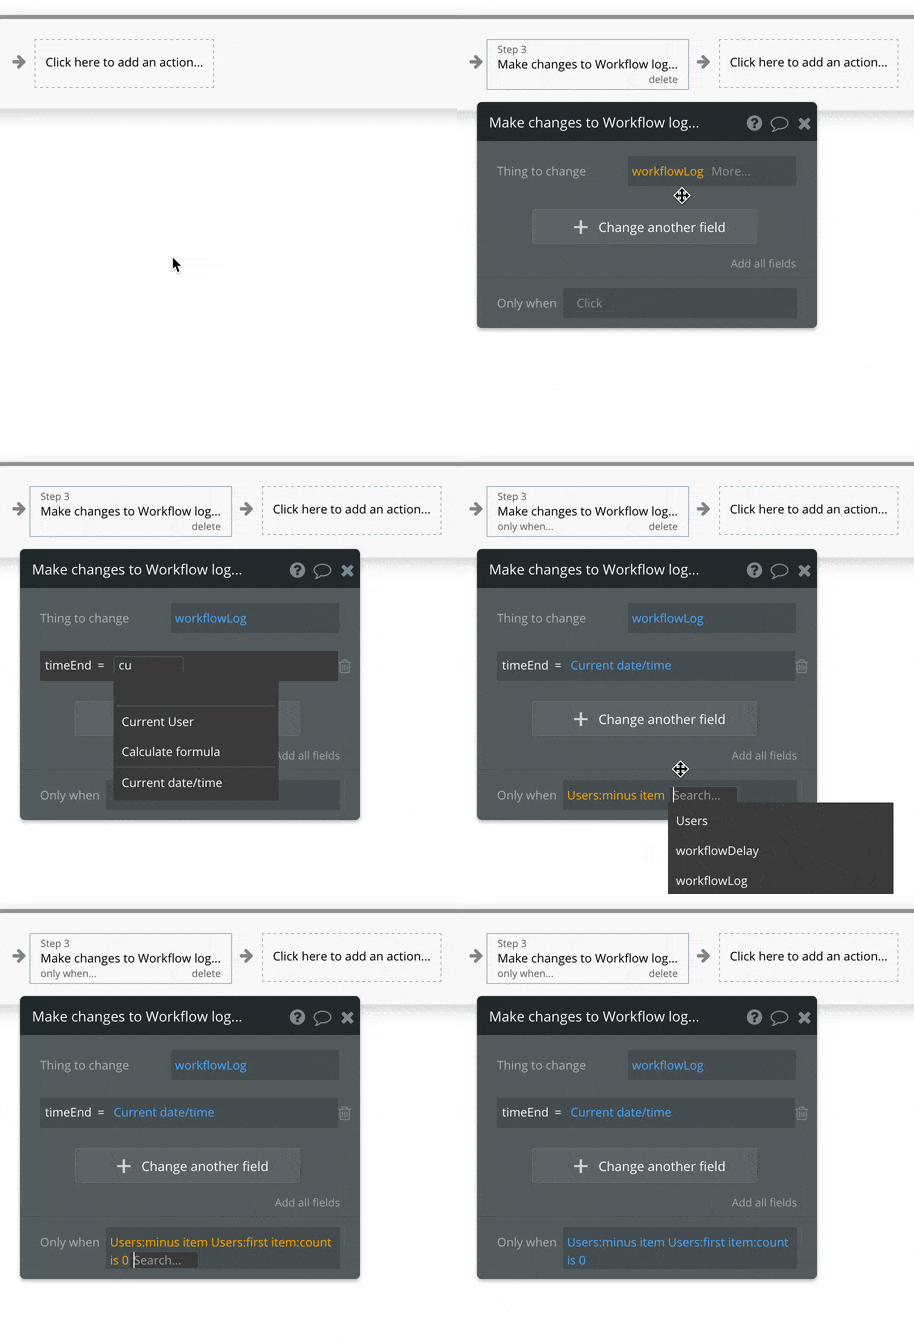
Now, we’re going to add one more step where we make changes to the log, but for this action we’ll set up a condition that makes sure we only run it once – when we’re at the end of the list:
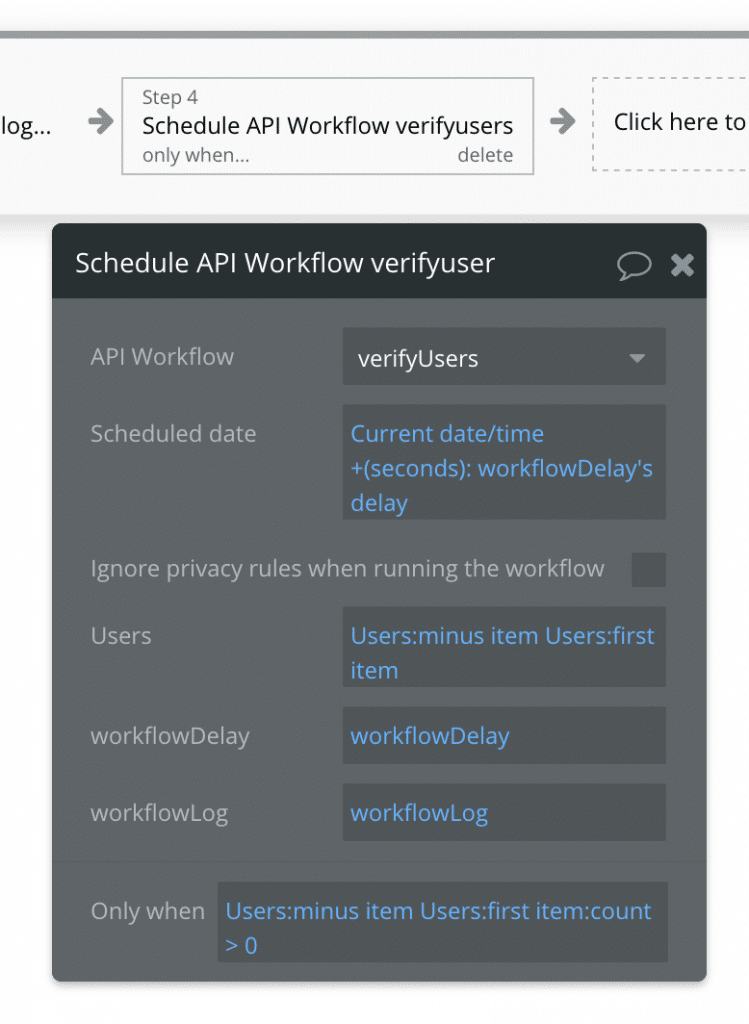
Lastly, let’s set up the recursive re-scheduling. This is the step you’ll recognize from part one that repeats the workflow as long as there are still records left to process:
All in all, your workflow should now look like this:
Setting up the front-end
Now that we have recursive workflow ready, let’s set up the front-end to see how we can use our new Workflow Log data type to visualize the process as it’s being completed. Let’s return to our opening GIF and see what we want to achieve. You can set up a similar design for yourself if you want to visualize it in the same way:

Here’s where we’re starting to see just how we can visualize the simple data we saved in the Workflow Log type. Let’s get the button workflow set up.
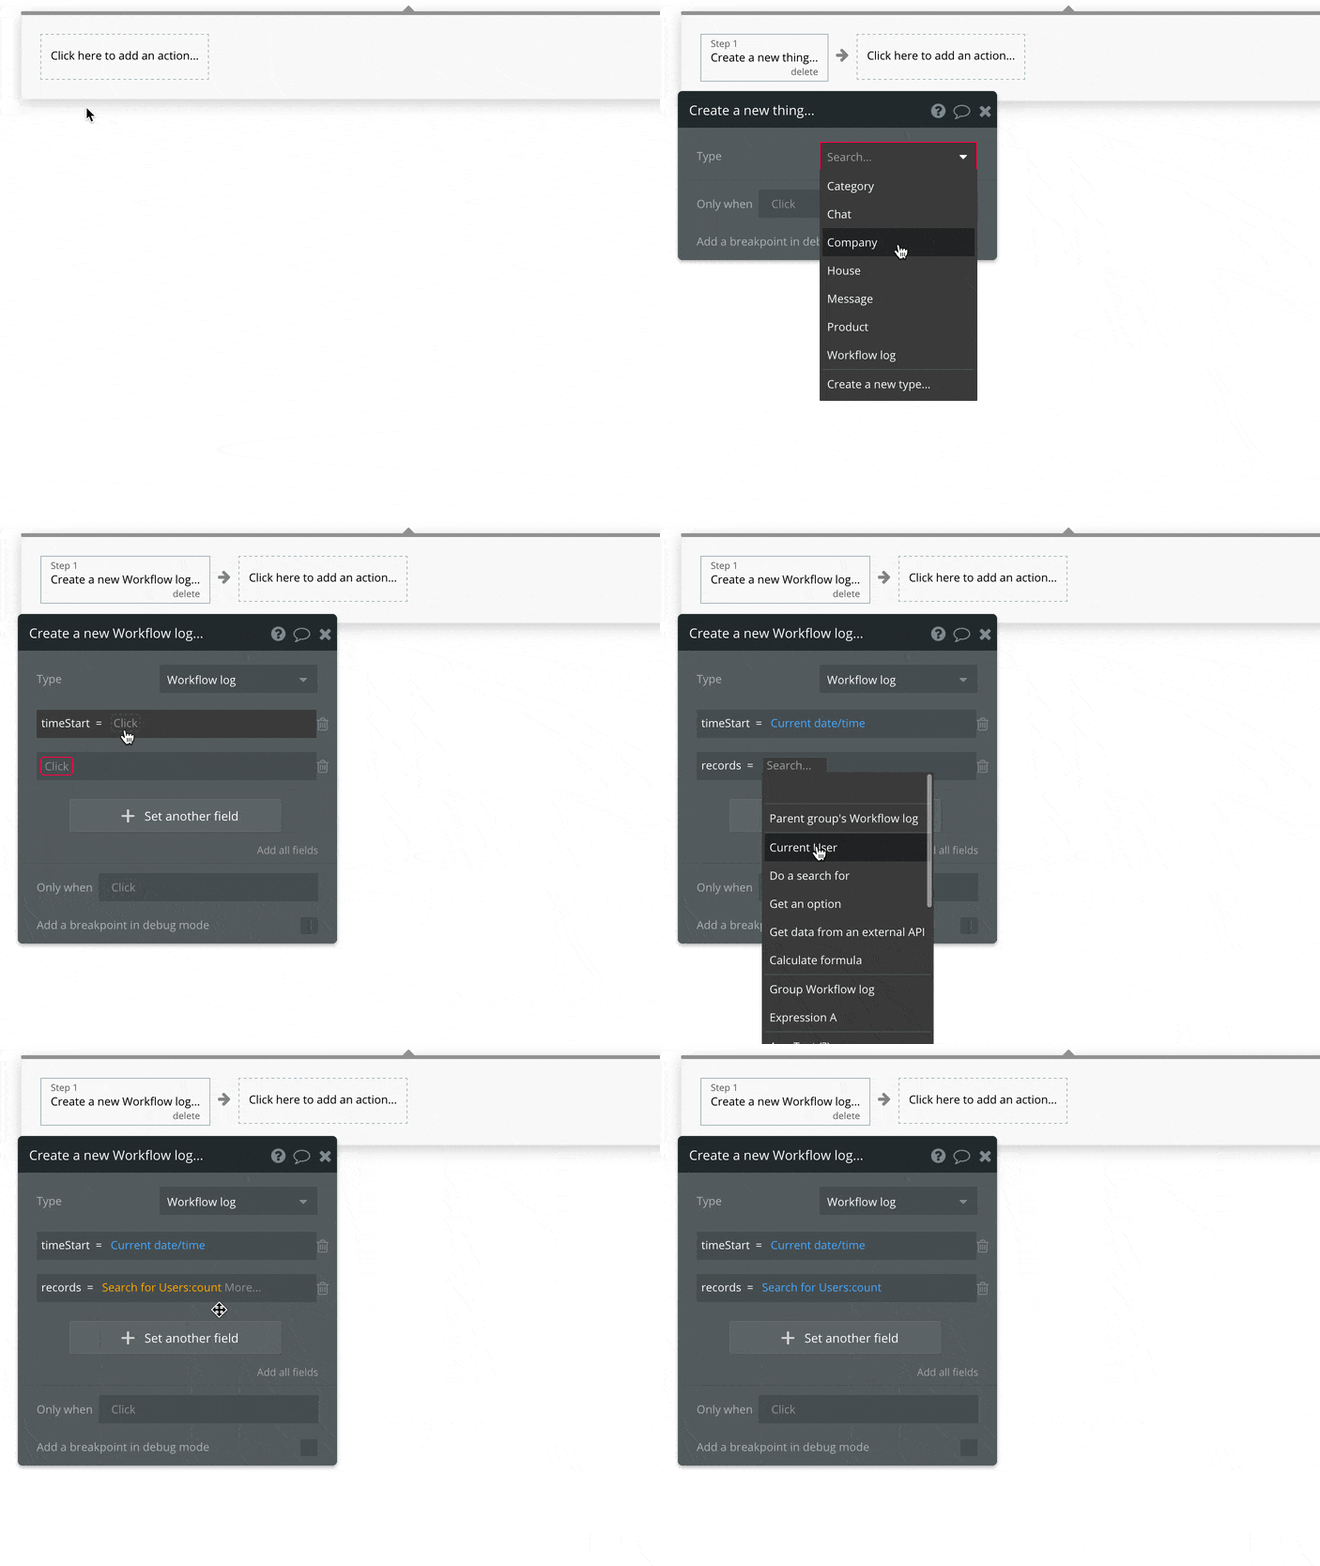
The timeStart field is simply for recording when the process started. In the records field, I’m searching for all the Users in my system and counting them. This way I’m saving the total number of records to be processed.
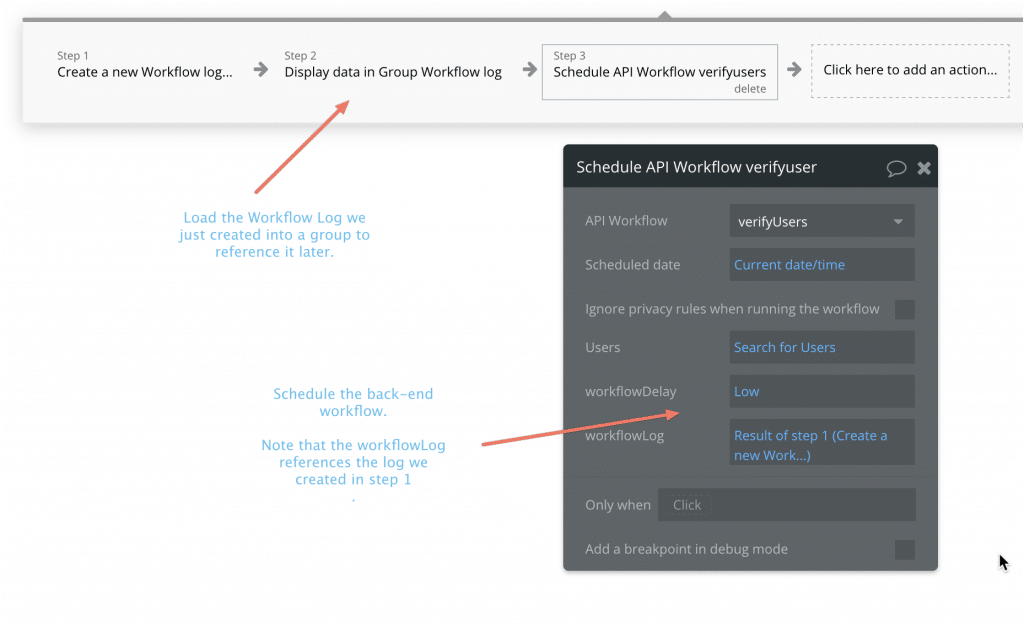
The next steps are straightforward. First, you’ll need to store the Workflow Log we just created somewhere. In my animation I store it in the group with the soft shadow, so that every element inside of it can reference it as its parent. The third and final step is where we schedule the back-end workflow.
Now as you can see from this screenshot from my editor, with the information we now have, you can visualize this progress in all sorts of ways. In this example I’m using the math.js plugin to calculate the percentage, and then reference its value in a standard Bubble Progress Bar.
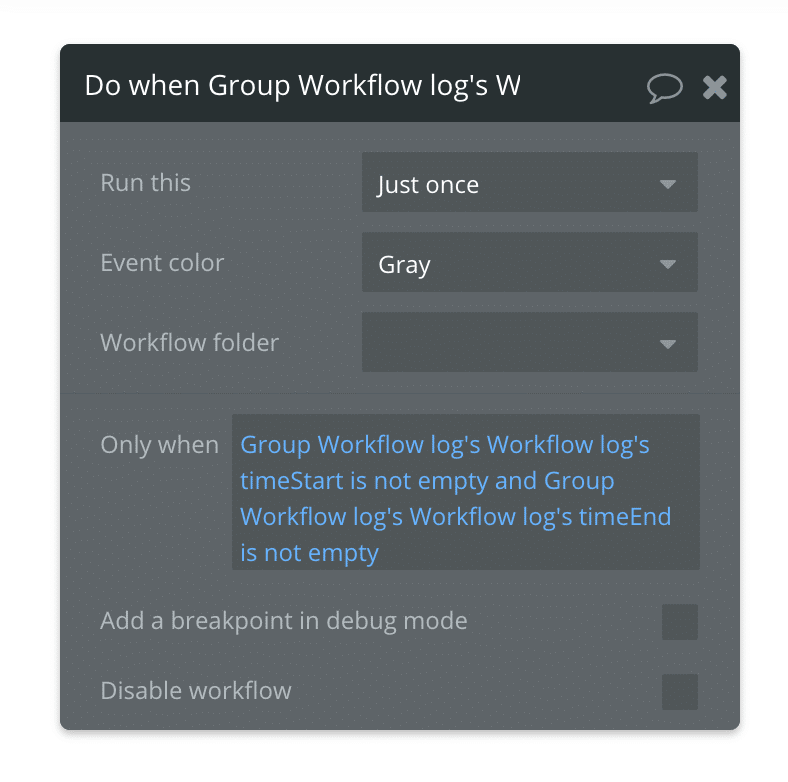
If you want to trigger something when the workflow is finished, you can simply reference the start and end dates in a Do when condition is true workflow.
And that concludes part 2 of the series on Recursive Workflows. If you liked this, you can also check out my book on Bubble performance or even buy me a coffee!


